Thursday, 5 December 2019

Calling in the Calvary and Channelling my inner Strawbridge.

At the moment I am ripping out the bathroom, getting this ready for the builder, and playing where does this water pipe go. I am so glad I am re-plumbing the whole bathroom, whoever put the last lot of pipes in didn't do a very good job. A supposedly soldered joint came away in my hand not a good start, and that happened more than once, only a mater of time before it would have leaked everywhere.

 My builder came round the other day to check measurements and then came up with a rather nice idea, in order to maximise space he suggested putting in a pocket door, this means that the washing machine and hot water heater will now have their own space and I get a much bigger hall wardrobe. Like most changes it does mean the dining room concept I had with an L shaped bench seat has now changed into something simpler. 

In order to get everything ready for Christmas, I have called in the cavalry and have got a builder in to help me. Things are going up rather rapidly. This means everything should be ready in a couple of days, for the bathroom, rather than 5 or 6 days if I did it myself.
Builder Miguel and workmate working hard.

I think is very easy to under estimate the time needed to do things especially if you are doing it yourself. Just look at Escape to the Chateau, Dick and Angel Strawbridge know when they need help and when they can do it themselves.  And also its knowing what help you need. Friends are a good source of free labour (well a few beers and a lunch out), but there are times when you need professional help. 

Once the bathroom has been done I will post the before, during and after photos. So sometime after Christmas will be the next update.

Thursday, 5 September 2019

Fans as in Ceiling not Football

I bought two rather cool Bluetooth enabled ceiling fans online at the end of July and started putting them up a couple of days after I received them. 


It was not as straight forward as I thought. 

One shiny new fan in box


Decided to just install one fan then a couple of days later install the other just in case there where problems with the first one. I must have had a psychic  moment as you will see. 


Getting ready to add the earth wire


Fan 1.
The fans require an earth connection, there was no earth at the ceiling point, just live and neutral. 

Earth wire attached now pull very carefully.


So had to run an earth wire, no real biggy but still a job I would rather not do as it always takes longer than you think.   Top tip when pulling cables is to use some washing up liquid to lubricate the cable, works just as well as any special cable lubricating liquid which costs 5 times as much.


All folded, origami anyone?
The fans came with a marking template which I thought was a good idea. The circular template was folded in half then folded in half again and pointy section (which is the middle when unfolded) was cut. This allowed me to place the template over the wiring and get the placement exactly where I wanted it.  Marked the four holes.


A hole in the middle
 
Drilled the holes, I always use my own rawlplugs  rather than rely on the ones supplied. Inserted the plugs, and this is where the fun begins.


The fans are not that heavy but are definitely a two person job. So throwing caution to the wind, I decided to fit them on my own. Trying to hold the fan with one hand connect the wiring with the other would have probably made a hilarious comedy sketch and had me thinking about the Only Fools and Horses Chandelier moment. (Google it to find out more). Any ways connected the wires, fortunately the connector was a quick connector type rather than the traditional screw type so you can just about do it with one hand. 


Next came the screwing it to the ceiling not as easy as it could have been. Again holding the now seemly getting heavier fan with one hand and screwing the screws in with the other,  fortunately I only dropped one screw.  After a few choice swear words managed to secure the fan to the ceiling. Turned the electricity back on and fan didn't work. @#?¿ I said. So switched the electricity off again climbed back up the ladder, undid the four screws, and the neutral wire had come out of the connector. So re-connected the neutral, screwed the screws back. By this time both arms where feeling rather numb. Switch the electricity back on and hey presto it worked. Downloaded the app as the fan can be controlled by an app or the supplied remote. And it worked for all of ten minutes, then it started having a mind of its own. The light changed from cool white to neutral to warm white and back again, the fan worked though. 


 More swearing this time I said &%$@ and other choice words of Anglo Saxon origin.  Took the fan down, I think you know the sequence by now.  Wired it up on my bed and plugged it in to a socket. Still bad. Had various theories from the flat above having a Bluetooth device that was interfering with it to demonic possession to it actually might be a bad unit.


Fan Jigsaw puzzle 
Decided best course of action was to make a cup of tea. Then as I had a second one I fitted that one, and it worked fine. So put the lamp shade on and the air vent disc.


So it must be a dodgy unit. Wrote to the shop where I bought it from. I was quite lucky as I found out the shop is only an hours drive from where I live, and said I would come by the shop to pick a new one up. So four days later I picked up the new one. 


Fan 1 was still working two weeks later so thought right lets install  Fan 2 ( reminds me of Thing 1 and Thing 2)


Fan 2:


 While doing the earth wire for the second fan I discovered that the old light was wired up incorrectly. Live came from the lighting circuit but the neutral was from the plug circuit, so had to correct that. Here in Spain all circuits have there own live and neutral, so when you switch off a circuit you not only switch off the live but also switch off the neutral. 


Apart from the incorrect wiring the rest of the fan 2 install was a piece of cake. Ohh cake. Time for another cup of tea and did someone mention cake. 

I now have two nice new ceiling fans in the bedroom. 
Ceiling fan


Monday, 12 August 2019

Part 6

So whats been happening this week then.
Well temperatures are just above 30ºC  and humidity is a good 70 to 80% so working on the apartment in this weather is quite a challenge. Apart from sweating out my body weight in water the rapid dry cement is drying too quickly by the time I have mixed it and got the first lump in to hold the back boxes in, the rest has dried. Adding too much water just makes in unworkable and very sloppy. So have changed to using a small amount of rapid dry cement and something called Yeso Contralado, its a type of gypsum based plaster and has a longer setting time than rapid dry cement  but not as long as normal plaster. And mixing the two together gives a more manageable and still fairly quick drying solution.


UK back box 
This picture shows the UK style back box (in part three I wrote about the switches I had selected) in the wall, with top and right side cemented with rapid cement only. The lolly stick is there to stop the  fixing screw holes brackets for the switches from moving during the cementing. 
Since putting this one in I have found that a slightly modified euro back box also accepts UK style switches. 
So will be using them from now on. The hole on the left goes through to bedroom 2 and to another back box.


This is the hole in the bedroom ready for the back box and conduit from the other back box above. This will then connect up to a back box in the other bedroom and up to a junction box near the ceiling. 

Finished lounge back box
Finished bedroom back box


                                                                                  Completed stage one of the back boxes for the bedrooms, and lounge. 


Fortunately the other switches are in the correct place, so no more back boxes for switches needed but still need them for the sockets. Like most older Spanish properties the number of sockets are rather sparse. So the plan is to add more, especially where the TV goes. So the plan is where there is a single socket (they are all single sockets) change them to doubles and put in either two doubles or a triple by the TV area. 

Next part I will be putting up ceiling fans in the bedroom, this will hopefully alleviate some of the heat and make it bearable for the rest of the summer.


Sunday, 7 July 2019

Curiosity Built the Flat Part 5

More changes to the bathroom so I guess its now bathroom V2.2 now.
Decided to change where the washing machine goes. This I hope will also save about €1000 euros in labour and construction costs. Amazing that just re-positioning the washing machine can save this amount of money. 
In the old plan the hallway wardrobe was going to be split into two separate cupboards. One becoming the new hallway wardrobe and the other going into the bathroom with the bottom part housing the washing machine.  All this chopping and changing of the wardrobe amounted to about €1000 euros. So changing it will save about €1000.
And I think doesn't look that bad.
Old version layout

This is the old layout with the washing machine in the revamped cupboard. 


And this is the proposed new layout. I think it looks better.
New version layout
New layout showing spacing
This other picture just gives an idea of spacing between toilet and sink. plenty of room. 


Its always a worry when planning things that you will get the spacing wrong. No matter how many CGI models and plans you do, sometimes a bit of cardboard cut out to the right shape and laid out on the ground will give you a better idea. 
Photos below are showing the process I went through before coming up with the newer shower screen . Good old cardboard boxes.
Showing the 30cm gap
New 110cm shower screen set up.


Monday, 1 July 2019

Curiosity Built the Flat Part 4

 So whats been happening.
 Well I have had the quotes in and while the prices aren't bad individually, add them all up and its way over budget.

 Looked at what the kitchen installer wanted to charge for the appliances, and it was rather a lot. So went online and after a quick Google found I could reduce the bill by €1500 which is quite a saving. 

 So I have started looking at other areas of the quote, and I think we might be able to shave a bit off here and there. We are close but the final amount needs to come down. If not I won't have the all important contingency plan, if certain things take longer than planned or something unexpected crops up. 

Unfortunately the installer is in Switzerland installing at the moment so will have to wait until he gets back.

So watch this space.


Monday, 17 June 2019

Curiosity Built the Flat Part 3

More changes, so I am now calling it bathroom 2.0.

Plan of bathroom
 The bathroom needs a little tweaking. Thu builder suggested a large shower tray measuring 160cm by 80cm the space width is 85cm. The length of 160cm means there is only a gap of 30.5cm at one point, so you would be unable to get to the sink. So I think the shower should be maximum of 110cm by 85cm.  And the 5cm gap at the side would be difficult to clean, and may be a nice place for mould to grow.
After a day of searching on the internet I found a company that will make shower trays and cubicles to measure.
The price isn't that bad either no different than an off the shelf one.
 Good job a saw this now and not when the builder starts. 


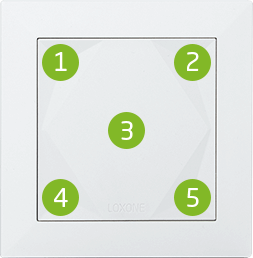
Loxone Touch Switch
Photo from Loxone
 I have also been searching for some nice switches. 
As I will be renting the apartment out in the summer, I need something that is practical and works with the Loxone automation system. While touch switches from Loxone look good, I feel for rental purposes they need to be easy to operate, and the touch switch would require a small instruction manual as they have 5 zones, each one can be programmed to do what you want.  

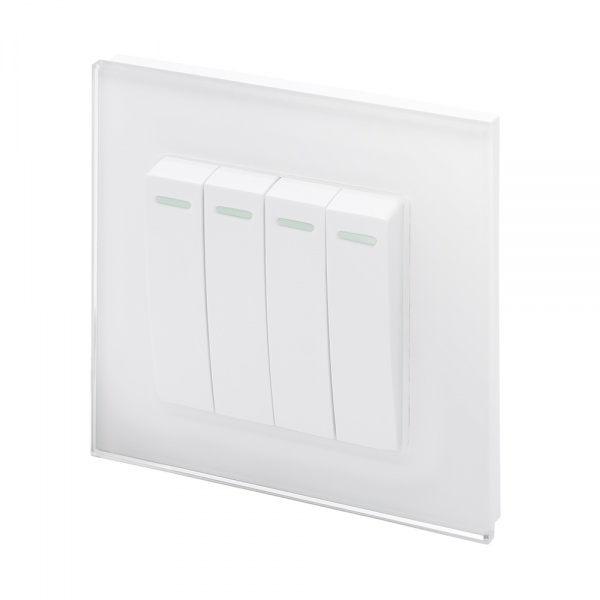
Retrotouch Light Switch
Photo from Retrotouch
 And a push switch doesn't need instructions as everyone knows how to use a light switch. The only difference is these are retractive or push switches (think like a bell push in operation).  Its taken quite a while and a few dead ends. One supplier actually stopped producing the switches I really liked. But I persisted and  have found these switches from a company called Retrotouch . They even have little pips on each switch that glow in the dark. The face place is made of glass. All I have got to do now is work out how many I need and of what type, and how to connect them up to the Loxone system. 
 The loxone system allows for multi click switches which cuts down on the number of switches, but again for rental purposes I won't be doing this. I will actually  have two files for the Loxone mini server. One for when I live there and another for when the place is rented out. 

The other thing I have been thinking of is energy saving. I don't want the AC's left on when no-one is in the apartment. The hotel key card system works quite well and can save up to 30%, but they are not fool proof and all you need to do is put a normal card in the slot and it will give you power. I have found a system that requires a special magnetic key to be put in the slot to give you power. What I want the system to do is when the key is removed it will turn off the AC and switch off the lights after a set time of about 30 seconds. Just got to find a supplier who doesn't want me to buy 30 of them.


Wednesday, 1 May 2019

Curiosity Built the Flat Part 2

Planing the renovation

My builder came round last week.

We spent nearly 2 hours discussing the main areas of renovation. The kitchen will be how the new plans show. 
The main change is in the bathroom. So what are the changes? Well these are moving the washing machine to a cupboard in the hallway but putting it so you can access the washing machine from the bathroom, the water heater will also go in the cupboard. The shower will now go where the washing machine and sink were. The sink will no go where the bath was.
As you can see a complete change for this room, I think the only thing that's in the same place is the towel rail and of course the toilet.

Its important to get these things right at this stage, doing it when you have re-done the plumbing etc is going to cost more. A good builder is worth their weight in gold. They simply know what works and what doesn't. So listen to them. You can always find a compromise if you need to. 

Tuesday, 2 April 2019

Curiosity Built the Flat Part 1

The purchase of the apartment happens next week, so as a taster here are the original plans and then the potential new plans.

Old Plan
New Plan


As you can see all the rooms apart from the kitchen stay the same in size. 
We will be knocking out the wall between the utility room and the kitchen, to make a larger and better functioning kitchen. 


More photos next week once I move in 😎 .


Monday, 11 March 2019

Part 3. The 3 most Common Electrical Problems and How to Solve them.

3. The ICP has tripped. 

Whats an ICP I hear you cry. ICP stands for Interruptor de Control de Potencia. It basically limits the amount of power coming into your home.  If you use more power than you are contracted for it will trip. 

 The ICP if you like can be thought of as a security mechanism. And it is a compulsory requirement. These days they are within the smart meters that the electrical supply company fit. 


ICP


Houses that don't have a smart meter will often have a separate breaker near the consumer unit. This will also have at least one if not two security tags in diagonally opposite corners, this is to prevent tampering.


Picture on the left showing an old fashioned style ICP. Notice the security tags. Some older properties may have this and a smart meter. So its worth checking if you have a smart meter.


So what do you do if the ICP trips. Smart meter version.

1.   Check that neighbours have power and nothing has tripped in the house. 

2a. If neighbours have power and nothing has tripped. If you can access your smart meter, then there is normally a green button located on the front which you press, and that's it.

2b If you do not have access to your smart meter, this is mainly in apartments or rental villas, then you will need to switch off all the breakers in the consumer unit.

3. Once you have switched off all the breakers, you will need to wait about 20 seconds.
4. After 20 seconds switch the breakers back on.


Photo Copyright Sogecam


Picture showing a Sogecam smart meter notice the green button to the left of the display, this is the ICP reset button.


Non smart meter version.

1. Check that neighbours have power and nothing has tripped in the house. 

2.  If neighbours have power and nothing has tripped. Then you will need to switch off all the breakers in the consumer unit.

3. Wait 15 to 20 seconds, and turn the breakers back on, and don't forget to switch the ICP back on.


If the ICP trips on a regular basis it maybe time to upgrade your electricity.

Tuesday, 29 January 2019

Part 2. The 3 most Common Electrical Problems and How to Solve them.

2. A breaker has tripped.

This happens when the live wire (brown or black) touches the neutral wire (blue), or excessive current consumption in the tripped circuit. 


The factors that can cause this are ;
  1. Faulty wiring insulation.
  2. Loose wiring connections.
  3. Faulty wiring in a plug.
  4. Too many things plugged into a socket.
  5. Faulty appliances

1. Faulty wiring insulation
 This is why its a good idea to get your wiring checked in your house or apartment. With older wiring the insulation can deteriorate and expose bare wires. 
 Also be careful when hanging pictures as you might accidentally screw into a conduit carrying mains electricity. So if the trip occurs after some DIY its a good bet that, you either drilled into a mains conduit or  a screw or nail is the culprit to the short circuit. 

2. Loose wiring connections
 Over time and due to thermal expansion, it is possible for connections to become loose, more so with screw type terminals, than the newer clamp style. So as the wire becomes loose the likely hood of it touching something it shouldn't becomes greater and it trips the circuit.

3. Faulty wiring in the plug
 This can be similar to above or due to mechanical damage to the cable. Vacuum cleaners are a good one where the lead to the cleaner gets sucked up. Another one are power tools, especially angle grinders and lawn mowers.

4. Too many things plugged into a socket
 This can be very dangerous. Often it happens when a hairdryer is plugged into a circuit, the reason is the circuit is now consuming more current than the breaker is rated for. Often its not until a breaker trips that you find exactly what is connected to that circuit, it maybe more than you think. Other problems are that too many appliances on one socket can cause the either wiring to get hot and melt the insulation or the socket itself to melt. There is also a strong risk of fire as well.

5. Faulty appliances
 This is often through age of the appliance and a fault has occurred within the appliance. The worst culprits tend to be tumble dryers, washing machines, dishwashers and electric ovens.
 If this is the cause then best call out the service engineer.

So you have a tripped circuit breaker what do you do next.

The procedure is ;
  1. Find your fuse box or consumer unit and locate the tripped breaker.
  2. Try and remember if it tripped because you just plugged something in. If so unplug it, and switch the tripped breaker on. If it trips again then, follow the steps below.
  3. Inspect power cords that are plugged into this circuit, one could be damaged unplug the damaged one and try again. Repeat if necessary. If it still tripping.
  4. Make sure everything on the tripped circuit is switched off. Then switch the trip back on. If OK then try switching everything back on again one at a time and if it trips when switching something on then its either the appliance or the wiring that is at fault.
  5. Repair the faulty wiring or appliance, this step may require the assistance of a profesional.
If there is no obvious problem and it is still tripping then its going to need a qualified electrician to sort it out. 
 It is possible that the breaker itself is faulty, it does happen from time to time even so get an electrician to sort it out.

In part three we will look at what happens when the ICP (Interruptor de Control de Potencia) trips.

Friday, 25 January 2019

Part 1. The 3 most Common Electrical Problems and How to Solve them.

It is usual that in any house, from time to time, we have to solve some type of electrical fault. Most are solved in a quick and simple way with just a basic knowledge of electricity

Of course, the problems that I will be describing to you below have an easy solution; But if you suffer a major electrical fault or have serious doubts about your ability, my recommendation is that you hire the services of a professional electrician.


1. The house has no electricity and the differential has tripped.

 Whats a differential I hear you ask well they look like this. Colours may vary. The yellow button is a test button and this should be pressed every 3 months to see if the differential trips.

 The differential has several functions within the house. It protects you from being electrocuted should you touch a bare live wire. And it detects any leakage of electricity. In normal operation the current flowing in the two wires (live and neutral) will be the same. When they are not the same due to a fault the diff will trip. The ones found in Spain also have over current protection as well. So if you are trying to use more current than you are allowed it will trip. This was common in older houses, and a cheap and not recommended upgrade was to increase the amperage of your differential. You should always contact your electricity supplier to upgrade your supply. All houses now have either a mechanical ICP (Interruptor Control de Potential) or its built in to your smart meter to prevent illegal upgrades.

So what do you do if you have tripped your differential. I always recommend 


  1. Switch off all the breakers in your fuse box (consumer unit). 
  2. Switch on the differential, some models, require you to push it down first then up.
  3. Then gradually switch back the other breakers.
  4. That should be it. 


What if the differential trips when switching a breaker back on?  then;


  1. Repeat the process above but leave problem breaker off and continue, you may have more than one problem. If the problem is only with one breaker check to see what is plugged into that circuit, and unplug everything and then switch the breaker back on.
  2.  If its OK then the trip could be caused by over current or a problem with what is plugged in. 
I have tried everything and even switched the breakers on in a different order, and it still trips. What do I do now?

Leave everything for a couple of minutes then try again. Next stop is to call an electrician. The more information you can give him the quicker it can often be fixed. 

And please remember any doubts, call an electrician.


Wednesday, 23 January 2019

A Warm Welcome

This is a brand new blog that's going to be looking at all things to do with renovation and new builds in Spain. 

 Some our first posts will be about electrics, since this seems to be a common topic and various Facebook groups to do with Spain. 

 We will unlock those mysteries of Spanish electrics, lay to rest some of the myths that a bloke down the pub tells everyone. 

Like anything to do with DIY and building please use qualified trades people if you feel unsure about trying to any work yourself.  Its better to be safe than sorry.

Renovation Station can not be held liable for any damages, accident, injury or death resulting from any of the subject matter within this blog.

So watch this space.

Update and fitting a Candy washing machine / dryer

 The bathroom is almost finished. Just need to get the aluminium arm that connects the glass side panel to the ceiling. The company that fit...